Learning Circuitry Part 4: The Finale
So this is where we put all the knowledge to the real test; making your very own MIDI device using Arduino.
As you would have known by now that Arduino is a micro-controller full of wonders.
It can help you develop anything you want. Using Arduino you can not only accomplish dull tasks like lighting bulbs in a row or controlling brightness but can actively build a MIDI machine of your own. This article will help you build a simple MIDI controller that will generate notes on the click of a button.
This is the finale of the Arduino series, however this is the very first step to building a complete MIDI controller, with knobs and what not. The knowledge you’ll gain from it can then be used for further experimentation, which is highly recommended.
Requirements
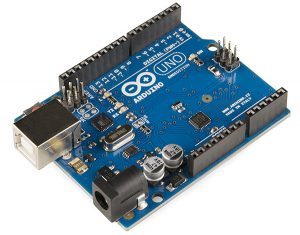
Arduino Uno – this is a prerequisite to building your own MIDI controller. As explained in the previous articles, this will act as a computer . Of course it won’t operate on its own and will require code to be uploaded to it; we’ll get to that later.
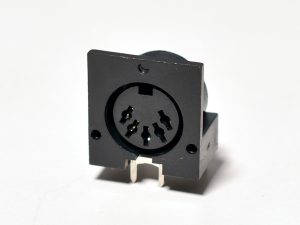
MIDI Jack – A 5-pin MIDI jack will act as an interface between Arduino and your speaker. I would recommend purchasing one that can be mounted onto a breadboard or PCB, just in case you wish to “cement” your creation.
Here’s the link to a low cost, sturdy 5 Pin jack.
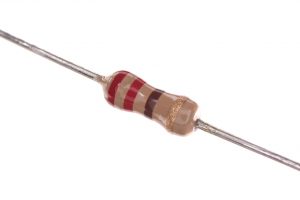
220 Ohms Resistor – This will be used as a “tap” to control the voltage out of the Arduino 5V port.
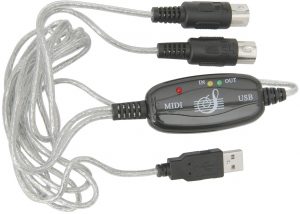
MIDI to USB Cable – This is required for testing the final controller. The cable is for plugging the MIDI controller into your computer. If you wish to plug the controller into a synth, then a male-male cable will suffice.
Wire – Purchase a spindle of copper or aluminum wire if possible as it will come in quite handy in future products as well.
Construction
If you know how to read a Datasheet then that’s well and good, if not then pay attention. Before plugging in your MIDI jack, you must know what each of the 5 pins do.
Here’s the link to the MIDI jack’s datasheet, just in case:
Pin 1 – Null
Pin 2 – Current Sync (Input)
Pin 3 – Shield (Ground)
Pin 4 – Current Source (+)
Pin 5 – Null
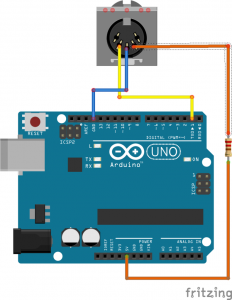
Follow these steps to make the circuit:
- Connect Digital GND of Arduino to Pin 3 of the MIDI Jack.
- Connect Digital Pin 1 of Arduino to Pin 2 of the MIDI Jack.
- Connect 5v Power to the Resistor.
- Connect the resistor to Pin 4 of the MIDI Jack.
The final thing you should like this:
The Code
This is a beginner MIDI controller so there won’t be a lot of hush hush stuff in it. The following code will go from F#-0 to F#-5 and give sound output.
void setup() {
 // Set MIDI baud rate:
 Serial.begin(31250);
 }

void loop() {
 // play notes from F#-0 (0x1E) to F#-5 (0x5A):
 for (int note = 0x1E; note < 0x5A; note ++) {

noteOn(0x90, note, 0x45);
 delay(100);

noteOn(0x90, note, 0x00);
 delay(100);
 }

}

// plays a MIDI note. Doesn't check to see that
 // cmd is greater than 127, or that data values are less than 127:

void noteOn(int cmd, int pitch, int velocity) {

Serial.write(cmd);
 Serial.write(pitch);
 Serial.write(velocity);
}
Burn the code onto your Arduino.
Connect the MIDI cable to the jack and to your computer. If you hear the notes, then viola! It works.
The Logic behind MIDI
MIDI is the only established way through which electronic devices share musical data with each other. The best way to gain a solid knowledge of MIDI is through understanding that MIDI itself isn’t music nor is it a music file like an MP3.
It is a stream of data or a set of instructions, much like a list of events that must be triggered by an electronic device in order to generate a specific sound. The device may be a computer, sound card, cell phone, synth, etc.
A few key phrases in the world of MIDI data are:
- Note on – this is to send a signal to the instrument that a key has been pressed. The message includes the pressed key as well as the velocity with which it was pressed.
- Note off – a message that says that the key has been released.
- Polyphonic key pressure – this is to tell the instrument how hard the key is being pressed once it has touched its minimum physical value.
- Control change – this is for indicating that an instrument like a foot pedal has been pressed or a knob has been turned.
- Pitch wheel change – message that shows that the user has altered the pitch of the note through a knob.
When MIDI is recorded onto a computer, the software used saves the entire list of instructions in the form of a .MID file which can be played onto an electronic keyboard or any other synthesizer.
MIDI instruments or synths are separated from MIDI controllers by the fact that they generate sound along with MIDI data. The best example of a MIDI instrument is an electronic keyboard that has hundreds of different instrument sounds stored in it. In addition to creating a sound, the instrument is able to save the combination of keys pressed for later use.
A MIDI controller on the other hand is just like a synth however it can only generate MIDI data and can’t play any sound. It is up to the attached hardware, e.g. computer to play the sound.
Buying Electronic Components
This was just the beginning of a very long journey.
Arduino, when coupled with some basic circuitry, can help you make full blown MIDI controllers. This article only used a resistor and didn’t complicate many things however you can bring a couple of components in the equation like the transistor, capacitor, inductor, op-amp and so on.
Experimentation is the key to learning. To get your hands on the best and most cost-effective electrical and electronic components, check out these sites.
- Jameco.com – My favorite place to go in most situations. It is based in the US, has cheap prices, and ships out fast.
- AliExpress.com – AliExpress is the Amazon.com of cheap stuff — including electronic components. Very, very, inexpensive. The only issue is slow shipping from China.
- Rentron.com
- HobbyEngineering.com
- AllElectronics.com
- GoldMine-Elec.com
- FutureElectronics.com
I hope you enjoyed this article! Please share this on social media to show your support. 🙂